Hickory Dickory Dock – ESL very young learners

Hickory Dickory Dock can be very boring… and repetitive… and put your very young learners to sleep.

Or, you can do an awesome 10-15 minute activity that helps your kids practice animals and numbers!

maxresdefault

You will need:

  • an audio method (tablet is best, but a USB and cassette player will work just as well)
  • song or video of Hickory Dickory Dock
  • a big box
  • a big clock
  • animals

Let’s talk a bit about where to get the materials.

1 Hickory Dickory Dock

love Super Simple Learning’s version of Hickory Dickory Dock. You can see it here on YouTube. (Check out their learning resources for your older students!) The elephant is so adorable, and kids always laugh when he breaks the clock!

2 A big box

You’ll need a big box to hold all of your activity materials. It’s way more fun when you can knock on the box and count before opening it than just bringing your materials in a bag. A box like the one pictured will hold all of your materials for your whole class and is available at IKEA. We buy 2 at a time, just in case they get broken by rowdy students!

730463f91f0f1b6e4672c76e809f955f

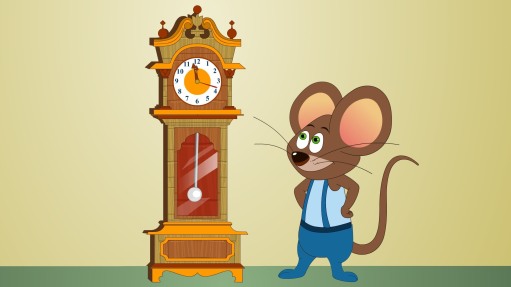
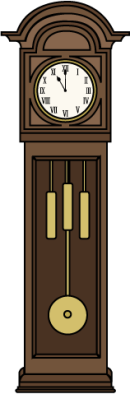
3 A big clock and animals

You can use a big clock and animals to re-enact Hickory Dickory Dock. If you will be teaching time, you can invest in a big clock (like this one on Amazon), or you can simply print off a picture of a clock.

grandfather_clock_by_accordingtosheblum-d61ot5z

For animals, you can either bring stuffed animals and animal puppets that you might have from other activities (which is lots of fun for students!), or you can print off some cute pictures of animals and laminate them.

Now let’s play!

Begin by playing the song and asking students follow-up questions during and after the song (what animal is that?, what time is it?, etc.).

Then have them knock on the big box and ask to open it (“Open, please!”). Pull out the clock and the first animal – pictures or real objects. Ask the students what the animal is, and give it to the first student who says it correctly. Repeat until all the animals are given out.

Now repeat the song, letting students re-enact the movements of the animal (going up and down the clock). Encourage them to repeat the animals and the numbers, as well as to count with the song.

When it’s the elephant’s turn, you can let the clock fall down or, if it’s a paper clock, crush it up. The students will have a big laugh.

Be sure to review the animals by saying “bye bye” to each one individually before putting it back in the box.

lyrics-poster-hickory-dickory-crash

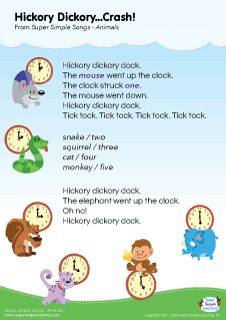
From Super Simple Learning

(If you use the Super Simple Learning version of this song, you can find all of the animals in their animal flashcards! Great!)

A note about our objects: 

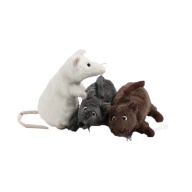
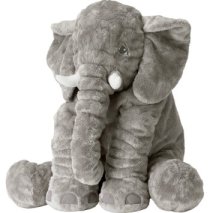
We use a large teacher’s clock and stuffed animals.

The mouse and elephant both come from IKEA:

1329818291zzkjm26ll-_sy355_
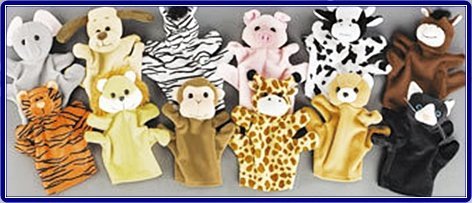
The cat and monkey are hand puppets from a set ordered on Amazon:

51qsh3mvszl

The snake was bought at a local store but is available to order online:

font-b-toddlers-b-font-infants-kids-children-boys-girls-colorful-wooden-worm-sensory-font

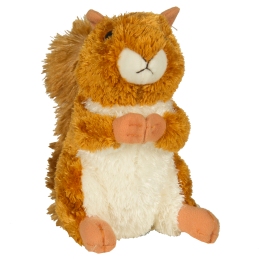
And the squirrel was purchased on holiday in the US, but can be found in lots of shops (we even recently found one that was a dog toy that would work perfectly!):

854927_l1

Teaching colors to ESL preschoolers

There are loads of cute worksheets for teaching colors to ESL students, even for young learners. You can find these for every context imaginable…

… like this introductory color-the-crayons activity, available for free on Teacherspayteachers.com.

0ad9edd9bb4fc8d4125c241d4c8b7bef

… like this monster-themed coloring activity that incorporates early reading, available from churchhousecollection.com.

learn20your20colors20picture20template20printout20cutout20craft20for20kids20preschool-opt285x369o02c0s285x369

… like this Christmas-themed color-by-numbers that provides a great review of numbers, available from Super Simple Learning.

03338fc2a831a06ba92f61b1ccb74c5c

… or, like this reading activity that incorporates coloring for comprehension, available from The Moffatt Girls.

b90b950eb7c56afa06b5137e951ef1ea

But what do we do when our students are too young for these activities? Even if kids are too little to hold a crayon, they still understand the concept of different colors and can start learning their names!

Colors are the easiest beginning lesson for very young learners because they will, for the most part, have developed this concept in their mother tongue. Here are five short activities that will engage your students while you teach them colors.

Color flashcards

color-flash-cards

Almost every colors lesson can start here: teach the students the colors on the cards. This is as easy as laminating some construction paper, and you can make it as fun as finding your favorite cartoon character in different colors. It’s great to use the words along with the colors, but it might be preferable to use solid color flashcards at the beginning so that they don’t confuse the object and the color (otherwise, you might have students calling all apples red).

For two- and three-year olds, you can start with only four colors and gradually build in more over the coming lessons.

Craft pom poms

51ra1i7wghl-_sy300_

Pom poms are great to teach colors because young students love them! You can put them inside a box, inside plastic eggs (like those you find at Easter), blindfold the students and get them to grab a handful before telling you the colors, or even ask them to pick one out of a bunch based on color. They are a great teaching tool!

Be sure to use only the bigger pom poms and watch children closely, as these can be a choking hazard!

Colored tablecloths

bb758e8469d4e1767af148f5cde6953f

You can use a plastic colored table cloth for a hundred different things in preschool! For teaching colors, you can ask the students to point to a color, place a favorite toy on different colors, tell them to put different hands and feet on a color (even practice left and right for advanced students!), have students tell each other which color to touch, match objects to the colors on the table cloth, etc.

The possibilities are endless! In Spain, you can buy a variety of fun plastic table cloths called hule by the meter at discount shops. Invest 10€ into a few different ones and incorporate them into your classroom routine!

Sorting Games with Plastic Food

71xc3kznf2bl-_sy355_

Learning Resources makes a fantastic fruit and veg sorting game available around the world on Amazon. But you can use any plastic food game – or, if you are brave, real fruits and veg – to practice sorting in your class. Just make sure that students are repeating the colors before sorting.

A great active game with sorting is to put a pile of fruit and veg at one end of the room and colored trays or buckets at the other end. You call out a color and the students race to grab a food that color, then put it in the correct place. If something like the game pictured above isn’t in your budget, you can use these c0lored teaching trays that you probably already have in your arsenal:

set-colored-plastic-trays-realistic-41266532

Fishing for Colors Game

img_52991

We’ve used homemade fishing sets to practice numbers with great success, but you can make them with colors to give your students even more variety!

Here’s a great post on how to make your own fishing set. We simply used two wooden dowels, string tied around a square magnet (similar to how you would wrap ribbon around a gift so that it stays put!), and paper clips on cardboard fish.

And there you have it! Five fun activities to help your very young ESL students learn and practice colors.

Vocabulary game: Hangman in the ESL classroom

Hangman will become one of class’s favorite games, and it’s very easy to organize! All you need is a writing surface (blackboard, whiteboard, mobile whiteboard, etc.) and your current vocabulary. This should be an easy activity to practice memorizing the vocab before moving on to more difficult activities utilizing the vocab.

This activity also helps practice the alphabet, so it should be used for students five and older (unless they already know the alphabet).

Put the students into two groups. Write the spaces for the letters and draw the gallows. Give student A from the first group a chance to give a letter. If it’s right, fill in the letter’s space. If not, write it below the word and add one part to the hangman. It’s a good idea to explain to students before you start what parts you will add – a chance to review body parts!

  
Then student A from the second group goes, then student B from the first group, etc. You can establish your own house rules, but we like to tell students that they can only guess the full word when it’s their turn. Give the group a point when one of the student from that group guesses a word. If you like, keep a running tally for the weekly/monthly championship.

They will love it, and you’ll have a fun game to review vocab!

“I’m fine, thank you.”

One of the most dreaded questions in every English teacher’s arsenal is: How are you?

From an extremely young age, students are asked this question and given the magic response “I’m fine,” which then grows into “I’m fine, thank you,” and stagnates at “I’mfinethankyouandyou?”

(And we are all aware of the vicious cycle known as andyouism.)

imfinethankyouandyou

The great news is that, with young learners, we can attempt to eradicate this epidemia before it begins. Today, we bring you a new part of your class routine: “How are you?”

With children who are three and four years old, you can already get them telling you how they really are, instead of that they are “fine.” (And if this doesn’t have you jumping on your chair, read on…)

hello-flashcards

Super Simple Learning makes a wonderful set of flashcards that you can print, laminate, and use every day for this part of your class routine. Find them here.

697eabd53527b36283b4be234fa932f0

After singing a hello song and making a circle, we review the emotions flashcards and make hand play for each one that they have learned. So, “I’m good” is one thumb up, “I’m great” is two thumbs up, “I’m wonderful” is reaching up to the sky, etc.

Once we’ve reviewed, we ask the student on our left, “How are you?” and (especially at the beginning) show them the options on a flashcard. They answer and then ask the next student (lots of times, we model the first few times with, “Ana, ask Carlos, ‘How are you, Carlos?'”). Go around the circle before moving on to your next activity.

With three and four year olds, we generally use “good,” “great,” “wonderful,” and “not so good.” With older students, you can incorporate even more emotions.

When a student answers with the dreaded “I’m fine, thank you,” we often try to mimic their answer, but exaggerating their style (very fast, very quiet, very sad, etc.) It gets them laughing and very interested.

When they discover that saying “I’m fine, thank you” is way more funny than “I’m good” or “I’m great,” then we incorporate high fives for those students that answer correctly on the first try.

Soon, you’ll be knowing more about your students’ emotions and hearing less of the dreaded “I’m fine, thank you. And you?”

Our Favorite Teaching Toy

Everyone has their favorite activities in the ESL classroom (hangman, a game, perhaps a toy doll), but we have found that we reach for one toy over and over for many different ages and purposes: the ABC foam blocks. These are the kind that we use:

Chenille Kraft WonderFoam Learning Blocks, available on Amazon.com

These blocks can be used from ages 1-10 (and probably older!). Here are a few ways to incorporate these activities into your lesson:

Very Young Learners:

  • Name the colors
  • Count the blocks
  • Build a tower (4 blocks per student) and then make them count to 5 before knocking it down
  • Do different actions with your blocks: put them on your shoulder, on your hand, on your foot, on your leg, on your tummy, on your head. Count to three and then tip your head so that the block falls on the floor (a big hit!).
  • Read the numbers
  • Race to the end of a room to get a specific color out of the pile of blocks (great for when your students are so hyper that your lesson plan is sinking!)

Young primary students:

  • Group the colors, numbers, letters, etc.
  • Identify the pictures (show them quickly so it’s not so easy!)
  • Guess the color (number, etc.) with your eyes closed
  • Build a big tower, letting each student add one block, until it falls down. The student to place the last block is out!
  • Play hangman with the pictures on the block.

Older primary students:

  • Write one of the words on the blackboard from the blocks and have the group give the student that is “it” hints to guess the word. Obviously, the student that is “it” can’t look at the blackboard and the group can’t say the word on the blackboard.
  • Hide the blocks around the room and have them write prepositional statements about where they find the blocks (“The block is between the book and the pen.”)
  • Use them as conversation starters (“This block has a penguin. Penguins are animals that live in cold terrain. They eat…”)
  • Play “I’m going to Grandmother’s house and I’m taking,” and the block that they pull out of the bag is the letter that they have to use.

As you can see, if we could only invest in one teaching toy, it would definitely be this one! What’s your favorite teaching toy? Leave us a comment and let us know!

St. Patrick’s Day Activity for Primary Students

Tomorrow is St. Patrick’s Day, and we’ve been in full green for two weeks! In an effort to teach students about the importance of wearing green, not to say “St. Paddy’s Day,” and that Ireland is a country in Europe, we decided to do a great activity for 1º-3º of primary school (ages 6-9).

We began with a Powerpoint activity explaining, in very simple terms, the following facts about St. Patrick:

  • St. Patrick is an Irish legend.
  • Patrick was a priest who lived in Ireland. There were also a lot of snakes living in Ireland, and people were scared of them.
  • Patrick wanted to help the people, so he took his drum and played loudly to scare all of the snakes. He walked all over the island until he scared every last snake.
  • Today, you can’t find snakes in Ireland.

For the 3º graders, we added the “real” story of St. Patrick to practice the past tense verbs that they’re studying right now in English class.

Then, we added a craft activity. For 1º and 2º, we used piper cleaners and plastic beads to make little snakes like these:

From Pinterest.com

For the 3º graders, we had them bring in a magazine and made a collage snake with one googly eye. Here’s a great idea:

From Pinterest.com

The students love making the snakes! Then, we planned a “visit from St. Patrick” for the 16th and 17th of March.

We used the following items to make a St. Patrick costume: a monk’s tunic (found at a costume store) with a cross necklace; plain mocassins (you could also use sandals); a white wig and beard (to keep the students from recognizing us); and a large djembe drum.

One teacher introduced St. Patrick to the class and asked questions about what they could remember from the Powerpoint presentation. Then St. Patrick played the drum and “collected” all the snakes in the class. He finally gave them a picture of a Shamrock, which they could wear if they didn’t have any green!

St. Patrick’s Day was a real hit!

Upcycled activity for ESL Young Learners

One of the keys to keeping very young learners (ages 2-5) interested and involved in the class is to switch games or topics frequently. An activity can be anywhere from 1-5 minutes; more than that and the students simply don’t have the attention span to stay connected to the material. Particularly for young students, it’s important to use English in a natural way rather than attempting to “teach” vocabulary and grammar out of context. That’s why playing with things that don’t seem very much like a serious English lesson is often so effective at helping young learners speak more English!

We are always trying to come up with new activities that can be fun for young learners and don’t require a lot of set-up or tear-down. The longer we spend preparing an activity, the less time that our students are getting active language practice, and the more likely they are to become distracted (although you can read about some passive teaching techniques here!). We need things that work quickly and are fun!

We have been trying out a new upcycled pasta shaker and have found that it’s lots of fun! It’s also a great way to practice numbers, colors, the “stop” and “wait” commands, and to turn nervous energy into a positive learning experience!

Pasta shakers require very few things that you probably have around your house or school:

  • a clean, dry plastic bottle with a lid
  • something that children can touch and count to fill the bottle

Here’s how we play pasta shakers:

  1. Show the students your plastic bottle. Ask what it is. Ask them if it’s an apple or a banana (no!). Tell them that it’s a bottle! What can we drink out of a bottle? Milk or water!
  2. Tell the students to listen (shhhhh, listen! in a quiet voice). Shake the bottle. They won’t hear anything. Look disappointed and even be a little silly with your bottle trying to make a noise.
  3. Bring out a small box with 10 pieces of pasta (You can repeat this activity with other fillers, like marbles, clean rocks or colored pasta. Make sure that it is an age-appropriate filler and that, should a student get it in his or her mouth, there is minimal choking risk!). Show the students and say Wow, pasta! We can shake the pasta!
  4. Count each piece of pasta as you drop them into the bottle. The students should count with you. Shake the bottle and tell them, Look! We’ve made a pasta shaker!
  5. Ask the students if they would like to make a pasta shaker. You can use “Yes, please” for very young learners, or “Can I make a pasta shaker?” for older learners.
  6. Hand out the bottles to the students. Give 10 fillers to the students one-by-one and help them count as they put the fillers in the bottle.
  7. Let them shake! You can invent songs, dances, etc., to make this even more fun!

You can expand later by telling students when to stop shaking (and count to a certain number before resuming their shaking!). This will help them learn to focus on you and wait for their reward.

Finally, say goodbye to the fillers and bottles. Save your upcycled pasta shakers for the next time!

ESL / EFL Peppa Pig Family Pre-Writing Activities

Happy New Year! We hope that everyone had a great holiday and is back to school and geared up for more fun learning!

We are starting a unit on family members with a group of students ages 3-5, so we wanted to share a few activities with you featuring one of our favorite ESL cartoons, Peppa Pig!

We will start out the unit with learning the names of the family members. We prefer the traditional “Mother, Father, Brother, Sister, Grandma, Grandpa” rather than teaching them the names of Peppa Pig’s family (Mummy, Daddy, Granny, Grandpa, etc.) You can explain that there are different names for family members if you wish, but we like to keep things simple at this age.

Here are some great Peppa Pig family flashcards thanks to ISL Collective:

Immediate Family

Extended Family

At this point, it would be great to watch clips from an episode of Peppa Pig in English, pausing the video and asking “Who is this?” for different members of the family.

To get students to begin recognizing the family members and tracing the words, use this fun coloring worksheet:

Peppa Pig Color and Trace Family Activity

Once you’ve reviewed the family members and started tracing the names, your students are ready for a bit of production! Use this simple worksheet to match the name of the family members to the pictures and then trace the words.

Peppa Pig Family Tree Match and Copy

Finally, use this fun worksheet from ISL Collective as a cut-out to practice reading and recognition skills!

Copyright en.islcollective.com

Your EFL students will love these Peppa Pig activities, and you’ll love the ease of teaching the family members.

Beautiful ESL Christmas Activities to Display

It’s that time of year! We are rehearsing “Jingle Bells,” we are juggling exams and grading, and we are trying to teach our students a bit about our English-speaking cultural holiday traditions! At our school, we focus on Christmas, although many of our activities have a general winter theme so that we don’t interfer with anyone’s cultural or religious followings.

Today we’re sharing our three new activities for this year!

1. Very young ESL learners and The Christmas Tree

One of the first things that we teach students when studying about Christmas is the tradition of a Christmas tree. This can tie in nicely with their science courses (the parts of a tree; deciduous vs evergreen; trees around the world; etc.) and the vocabulary is easy enough.

We use the Christmas carol O Christmas Tree as a sing-a-long in the class. Then, each student gets to decorate an ornament (which we found on Google Images and pasted to card to make them sturdy) and hang it on our big primary tree.

20141210_124253

Copyright lessonplansesl.wordpress.com

20141210_124343

Copyright lessonplansesl.wordpress.com

Finally, help them read the lyrics to O Christmas Tree that you’ve printed out on a piece of paper. Add a color-by-number Christmas tree to half of the paper and fast finishers can color another beautiful decoration!

2. Dextrous ESL learners and The Recycled Snowman

This activity is great paired with a cute story about a snowman or playing in the snow. We found three appropriate stories in English in the youth section of our local library, and Amazon.com and Abebooks.com has lots of possibilities! (Don’t forget that you can download lots of ebook options if you have a projector in your class!)

Then we make a little snowman out of a recycled toilet paper roll (ah, the neverending craft supply box!) and a recycled sock. Googly eyes and white stickers that can be painted as buttons and then stuck on quickly help this activity to run smoothly. This requires a bit of preparation, but this website walks you through it. These are super adorable but not for tiny fingers!

20141210_110053

Copyright lessonplansesl.wordpress.com

20141210_110033

Copyright lessonplansesl.wordpress.com

3. Late Primary Students and The Snowflake Wonderland

Moving away from the traditional themes of Christmas and more towards the theme of winter wonderland, this activity allows us to talk about the science behind snowflakes. Why do snowflakes form (lesson on solids, liquids and gases)? How many sides do snowflakes have (lesson on geometry and symmetry)? Where can we see snowflakes (general winter vocabulary lesson)? Have you seen any films with snowflakes (our students are going crazy – in a good way – when they sing “Let it Go” from the film Frozen and then gap fill the lyrics)?

As a craft, they can make their own paper snowflakes and create a winter wonderland in a room or corridor. This website teaches you how to make them (depending on the age, your students might need a bit of help with the last step before cutting).

20141210_125330

Copyright lessonplansesl.wordpress.com

20141210_125349

Copyright lessonplansesl.wordpress.com

All of these activities will please parents and other teachers, decorate your learning space (think less bulletin board duties for you!), and give your students a great use for their pre-holidays energy.

What’s your favorite Christmas activity? Share it with us in a comment! And have a happy holiday season!

Great Introductory Activity for ESL Young Learners

So how do we get very young ESL learners into the zone for learning English? We’ve already talked about the importance of establishing a classroom routine that students will learn and be excited to repeat. If we incorporate our greeting into each class, it will form part of the classroom routine and will encourage students to start speaking English from the first minute of class!

One of our tried-and-true activities for starting off classes with very young learners is a simple song with puppets that allow students to imitate what they are hearing. This works for students 1-3 years old, and you can adapt it with more difficult songs for older students.

We recommend getting lots of varieties of puppets so that this activity is interesting each time, yet still predictable enough that students will be comfortable with it. Some of our favorite puppets are: animal hand puppets (like these from Amazon.com), plastic finger puppets that stand up well to teething little ones who will always put whatever you hand them into their mouths (like these, also from Amazon.com or Oriental Trading Company), felt finger puppets (like these from Ikea), and puppets that relate to something they already know (like these, if you have read or sang “Five Little Monkeys” with your young learners).

ESL young learners can get excited by puppets! Copyright http://www.abingdonmusic.co.uk

Here’s how to do the activity, which takes 3-7 minutes, depending on our students:

    1. Show students a box which contains the puppets, asking “What’s in the box?” We can shake the box, put it to our ears, knock on it, and do other things to draw the students’ attention to the box.
    2. Ask students if there is a banana (or other cognate) in the box. How about a car? (making vroom vroom noises)
    3. Open the box and show students the puppets. We’ll hold the box close to us or away from the students so that they don’t immediately grab the puppets.
    4. We will take out two puppets, put them on our fingers, and put the lid on the box.
    5. Play this simple Hello Song offered on YouTube by Turn On Your English. We always play from 0:19-0:55 so that it’s a quick and fun song. (Remember to face your screen away from the students if they get distracted by the video, or simply use a recording.) Use each puppet to mimic what the puppet on the screen (or in the song) is doing, so that it seems like the puppets are truly greeting each other.
    6. Now, we’ll invite the students to take part in the fun! Allow each student to pick out a puppet (build their English by first asking “Would you like a puppet? Yes, please?” and getting them to respond “Please.” Work up to “Yes, please,” and finally, “May I have a puppet, please?”). Repeat the song with the students, encouraging them to sing.

It will take a few classes before the students open up, come to expect the puppets’ presence, and want to start singing. But every (let’s face it, repetitive) second that you invest in this activity will help set a positive and motivating tone for the rest of your class. Eventually, your students will scream “puppets!” when they see the box, want to be the first to pick out a puppet (thus improving their behavior) and will start singing their greetings.

What other introductory activities work well in your ESL young learners classroom?